Best SEO Settings for Blogger || How to Change Custom Robots Header Tags & How To Add Custom Robots.Txt File In Blogger?
So First of All you have to Change your Custom Robots Header Tags Settings
Every blogger wants huge organic traffic on his/her blog. For that we need to optimise our blog for search engine to increase the visibility of our blog.
We can customise our blog pages for better SEO by telling search engines that what part of our blog they have to crawl and what not to.
What is Robots Header Tags?
Firstly, we must know about what is robots header tags before adding them to our blog. So we will specify each option briefly here :
1. all : This tag allows crawlers to crawl your blog freely without any boundations.They can easily index, crawl and expose your contents.
2. noindex : This is for secret blogs like if your blog is for private use then you must try to hide the url from exposing it publicly. So this tag lets crawlers to stop crawling your blog.
3. nofollow : All your outbound links are dofollow by default. This let search engines creep upon your pages you page bounded to. If you don't want search engines to look at your outbound links then this tag will helps you.
4. none : It is a combination of noindex and nofollow. You can set it accordingly as per your needs.
5. noarchive : Search engines sometimes saved a copy of your blog pages and show it as cached copy. Enabling this tag do not let crawlers saved cached copy.
6. nosnippet : If you want to keep your post contents secret then you can enable this tag.
7. noodp : This tag disable crawling your blog by Open Directories.
8. notranslate : Enabling this tag do not allow translation of your blog pages.
9. noimageindex : As specified by the name, this tag disable indexing your blog images.
10. unavailable_after : This let webpage indexing after a specified time.
Now, I hope you understood the robots header tags. So now lets start adding these tags to your blog.
Adding Custom Robots Header Tags in Blogger :
1. Visit blogger.com and sign in to your account.
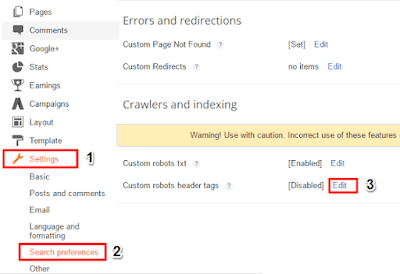
2. Then go to Settings >> Search preference. There you can see a setting called Custom robots header tags under Crawlers and Indexing. Click the Edit link.
3. At this step, Click on Yes.
Adding Robots.txt to Blogger Blogs:
To add Custom Robots.txt file to your blog, follow the basic steps mentioned below:
1. Go to your blogger blog.
2. Navigate to Settings >> Search Preferences ››
5. Remember to change the highlighted url (example.blogspot.com) with your blog address.
6. Click on Save Changes button.
You are all done. I hope you all easily added the custom robots.txt file in your blog.
So First of All you have to Change your Custom Robots Header Tags Settings
Every blogger wants huge organic traffic on his/her blog. For that we need to optimise our blog for search engine to increase the visibility of our blog.
We can customise our blog pages for better SEO by telling search engines that what part of our blog they have to crawl and what not to.
What is Robots Header Tags?
Firstly, we must know about what is robots header tags before adding them to our blog. So we will specify each option briefly here :
1. all : This tag allows crawlers to crawl your blog freely without any boundations.They can easily index, crawl and expose your contents.
2. noindex : This is for secret blogs like if your blog is for private use then you must try to hide the url from exposing it publicly. So this tag lets crawlers to stop crawling your blog.
3. nofollow : All your outbound links are dofollow by default. This let search engines creep upon your pages you page bounded to. If you don't want search engines to look at your outbound links then this tag will helps you.
4. none : It is a combination of noindex and nofollow. You can set it accordingly as per your needs.
5. noarchive : Search engines sometimes saved a copy of your blog pages and show it as cached copy. Enabling this tag do not let crawlers saved cached copy.
6. nosnippet : If you want to keep your post contents secret then you can enable this tag.
7. noodp : This tag disable crawling your blog by Open Directories.
8. notranslate : Enabling this tag do not allow translation of your blog pages.
9. noimageindex : As specified by the name, this tag disable indexing your blog images.
10. unavailable_after : This let webpage indexing after a specified time.
Now, I hope you understood the robots header tags. So now lets start adding these tags to your blog.
Adding Custom Robots Header Tags in Blogger :
1. Visit blogger.com and sign in to your account.
2. Then go to Settings >> Search preference. There you can see a setting called Custom robots header tags under Crawlers and Indexing. Click the Edit link.
4. Now, you will get a set of check boxes. It looks complicated but trust me its not! Just refer to the below image for best settings.
Thats all! You have all done.
Now
How To Add Custom Robots.Txt File In Blogger?
For better performance of our blog we need to optimise it for better SEO. A better SEO is also needed to get organic traffic from search engines. One great step towards a better SEO is adding robots.txt file to your blog. It tells the search engines crawlers about what page to crawl and what not to. So Lets Start
What is Robots.txt?
Robots.txt is a file which tells the search engine crawlers what page to crawl and what not to. Simply, you can exempt your blog demo pages, label pages, archive pages and other which you don't consider as important. Search engine crawlers always scan the robots.txt file before crawling any blog.
So lets start adding this great SEO improves to your blog.
Adding Robots.txt to Blogger Blogs:
To add Custom Robots.txt file to your blog, follow the basic steps mentioned below:
1. Go to your blogger blog.
2. Navigate to Settings >> Search Preferences ››
3. Crawlers and indexing ›› Custom robots.txt ›› Edit ›› Yes
4. Now paste the below robots.txt file code in the box.
User-agent: Mediapartners-Google
Disallow:

User-agent: *
Disallow: /search
Allow: /

Sitemap: http://example.blogspot.com/feeds/posts/default?orderby=UPDATED
5. Remember to change the highlighted url (example.blogspot.com) with your blog address.
6. Click on Save Changes button.
You are all done. I hope you all easily added the custom robots.txt file in your blog.
IF YOU LIKE THIS POST THEN PLEASE SHARE IT WITH YOUR FRIENDS AND BOOKMARK THIS PAGE FOR LATER


1 Comments
Awesome.. very useful
ReplyDelete